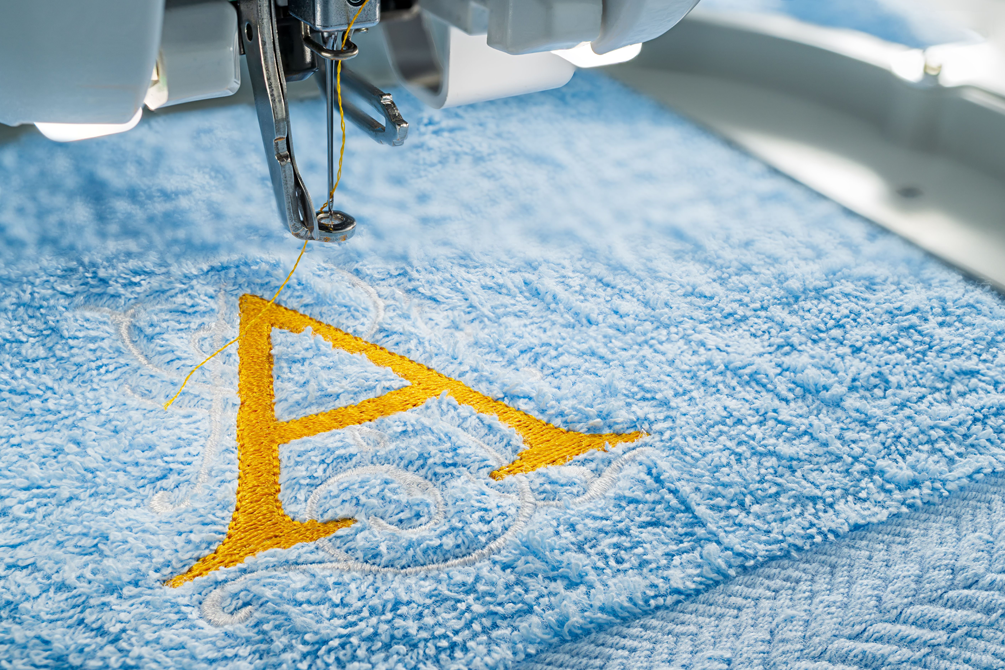
Custom embroidery printing has always been a great way to help make your promotional products stand out. A customized embroidered logo or slogan on a garment imparts a ‘classy’ touch.
When you design an embroidered item, there are several things you must ensure to consider to achieve the final product of the finest quality.
Let’s walk you through top embroidery machine design tips to follow when embroidery on clothing garments or similar products.
Use a Simple Design
Sometimes, too complex designs may impact the overall appearance of the embroidered print. This is because stitching leads to creating a thicker line than ink and can result in designs becoming convoluted and illegible.
There are various brands like Polo and Lacoste, which have used embroidered logos, and these logos have been popular for the last few decades.
The reason is that their simplistic designs that convey more in less and give a standout look to t-shirts.
Don’t Go for ‘Too Big’ Designs
Large embroidered pieces work only on a few selected sports jerseys (hockey team patches, football player numbers, etc.) but not on the other regular clothing items. It is because simple costume pieces with huge embroidered designs would look like walking billboards.
So, it is good to consider designing small but well-detailed embroidered logos with a nice finishing touch.
Use the Correct Fabric
Choosing the right fabric is of very high importance when designing embroidery. Embroidered logos look great on denim and knits but generally don’t go well with cotton or performance fabrics.
As a result, these embroidery pieces look great when you buy brand new products. But hardly after a few washes, these embroidered designs start fading.
Embroidering lighter fabrics can be a good idea as the material will gather around the embroidery and give a ‘permanently wrinkled’ appearance to the apparel.
Properly Place the Embroidery
The placement of the embroidery matters for the work done to be rendered effective. Putting up a brand name exactly in the middle of the chest may not go well, but a small logo on the left chest (like in Polo or Lacoste) can work well and look ‘cool.’ There may be other sites like a sleeve or the hood of a sweatshirt that you can place embroidered designs on.
Avoid Being ‘Too’ Generic
Going for simplified logos and branding is good to avoid overcrowding, but at the same time, being ‘over-simplified’ can also backfire. As over-simplifying, the logos or designs may simply lose the meaning itself they are supposed to convey in the first place.
Therefore, always see to it that you maintain a fine balance between simplistic yet meaningful and effective designs.
Nowadays, several small embroidery business owners are adopting free machine embroidery for embroidered design printing.
So, let’s walk you through the following machine embroidery tips that can help achieve the best-embroidered designs.
Make your business stand out with custom embroidery. Check how a Product Customization Tool can be helpful.
Set Up Your Embroidery Machine Properly
Ideally, almost all sewing machines are capable of free-motion stitching.
So, before you start embroidery, check your machine and its parts thoroughly to find out if they are working well.
The Feed Dogs
The feed dogs – the little ‘teeth’ underneath when disengaged no longer move up and down while stitching. This lets you move the fabric in the direction you want easily.
The Free Motion Foot
One essential item you need for machine embroidery is the free motion foot. Some machines feature a free-motion foot amongst the standard fittings, and you may need to contact your sewing machine supplier for that.
By fitting a free motion foot to your machine and dropping the feed dogs, you can take control of stitch direction and the speed of movement of fabric under the needle.
When you use the free motion feet, lower the feed dogs, and alter the stitch length setting to zero or as close as it goes to zero.
Choose the Right Needle
Choose the best needle to achieve a great output. There is a wide range of specialty needles out there, each for a specific purpose.
Some of them are a machine embroidery needle, top-stitch needle, quilting needle, or metallic needle thread. Choose a good needle brand like Schmetz for your embroidery work.
The second factor to focus on is the needle size that depends on what you are working on. Most of the free motion work is done with needles ranging in size from 75/11 to 90/14 suffice.
Always make sure the needle is sharp. Thread sketching can make the tip of the needle blunt over time, which means you should be having a continuous supply of needles. A ‘dull’ needle can result in tension problems and fraying thread.
Pick the Right Fabric
The fabrics contribute significantly to the appearance of the final product and show us how the stitching process is.
While you can always go for cotton for simplicity, you should choose silk or shantung for elegance and fabrics like burlap, corduroy, velvet, or faux fur for texture. However, if there is still anything like the best to work with, in the case of embroidery, it is cotton – preferably 100% cotton.
When it comes to cotton fabric, there are several ‘weights’ you can choose from. Once again, your choice will likely be determined by what you want to use your project for, once complete.
Regardless of weight, try to choose a fabric with a high thread count. It is recommendable to pick a thread count of a minimum of 200. This is because a high thread count indicates that the fabric is tightly weaved and is less likely to be puckering or getting distorted.
On the other hand, if the weave is loose, it would be more liable to puckering and distortion. In many situations, you will also need to employ either a firm stabilizer or an embroidery hoop to prevent pull-up.
Just because cotton is an ideal choice, don’t think it is the ‘only’ choice. If you stabilize gorgeous fabrics like silk, it too can become easily stitchable.
Looking for a customization tool for your embroidery business? Explore the many features of the tool here.
Choose the Right Embroidery Thread
While preparing to create embroidery, your choice of thread is also very crucial. Though almost any thread can work for machine embroidery, you should still invest in a good-quality thread for better and consistent results.
Read on to know the major types of embroidery thread.
– Heavy gauge threads can fill areas more speedily and create more texture, while finer gauge threads are good for areas that require dense shading or blending of colors.
– Shiny or glossy threads are fit for thread sketching. But if the lossy look isn’t what you are exactly looking for, you can also pick a matte cotton thread.
– Variegated threads are available in a wide range of colors and can help reproduce wonderful effects.
– Metallic threads add exciting highlights but can pose challenges too, which requires you to practice with metallic thread on different apparels before.
The ideal thread weight that is most convenient is 40 gauge. However, if your work is supposed to be very delicate and fine, a finer thread can be a better option.
Stabilise Your Fabric
To ensure trouble-free working and a stunning design, stabilize the surface you are stitching on before you begin embroidery. For that, you can pick a suitable stabilizer that will be highly helpful in avoiding issues arising out of unnecessary movements and unnecessary movements as you stitch. There are a number of stabilizers based on the type of project. There are a few points to consider while choosing the stabilizer.
Choosing a stabilizer
While choosing a stabilizer, think of the project you intend to complete.
Ask yourself some questions given below that will help you determine the type of stabilizer you will need.
– Is your project a stand-alone picture (or logo), an embroidered or thread painted picture on a larger quilt?
– Will your design serve just like an embellishment on another extensive work or be a complete picture by itself?
Stabilizers are available in various types – ranging from ultra light, filmy tear-away, cut-away Stabilizers to soluble Stabilizers that wash away in water, to super heave and stiff Stabilizers to secure even the densest of stitching.
Further, they can be available in fusible and non-fusible types also.
Read on to know how to choose the stabilizer for your intended work.
– Light or minimal thread sketching – A light fusible stabilizer, tear-away stabilizer, or an embroidery hoop can fit the purpose. If you use batting, you may even avoid using the stabilizer.
– Medium or large art quilt – A medium weight stabilizer can work well for this.
– Stand-alone picture for wall art – A medium-to-heavy weight stabilizer can be suitable so that you can make them as stiff as necessary.
– Densely stitched thread paintings – A firm stabilizer will be necessary. Or else, you can use a tear-away stabilizer in combination with a very firmly secured hoop also.
Press properly to smooth out all layers to avoid any unnecessary lumps or wrinkles in the design.
Pin and fuse the layers properly to prevent them from shifting while working.
Using an Embroidery Hoop
An embroidery hoop is a feasible option or stabilizing in several situations.
The most important thing to understand is that you should check whether the fabric is taut and not distorted before securing it in the hoop. Also, you must tighten the screws securely to prevent unwanted movements.
Draw, Paint, or Print Your Design
Mark the intended design on the fabric before you begin embroidery.
While some people are okay with a lightly-sketched guide, others would print or trace their designs completely onto the fabric before beginning the actual embroidery work.
If you choose to follow the painting or printing paths, you would need fabric paints or a printer to have the design onto the fabric. At other times, you would also need a quilt marking pen of some type. Again, there is a large variety of a quilt-marking pen ranging from a simple pencil to heat-erasable markers.
While choosing the fabric marking pen, be careful. While some fabric marking pen companies claim their pens to be ‘air erase’ or ‘washout,’ they don’t turn out to be completely like that. That is why always check on a piece of scrap/leftover fabric first to find out whether the pen marks wash away or stay.
One of the safest products to use in terms of removability is a chalk quilt marker because you can easily brush off the chalk or wash it away.
Always remember that pens weren’t designed for use on fabric. Despite that, many quilters and embroiderers across the world have been using them owing to the convenience and accuracy they provide.
Once you complete drawing your design on the fabric, you can erase the markings by pressing the fabric with a warm iron.
Check your Sewing Machine Tension
Sewing machine tension is a crucial factor to consider while aiming to create perfect embroidery designs. If you have a well-maintained machine calibrated to factory settings, you would be facing minimal problems arising out of tension.
Sometimes, when you use a different weight thread in the top and bobbin of your machine, you may need to make small adjustments to make the stitching even on both sides of your work. Test it first on a scrap fabric piece, whether it is alright.
– Maintain the machine correctly to avoid tension problems if you intend to use the same weight thread in the top and bobbin of your machine.
– Go for a good-quality thread if you intend to use different weight threads in the top and bobbin, conduct a test-run, and make small adjustments to the upper thread tension until satisfaction. Do a test-run first and make small adjustments to the upper thread tension unless you’re satisfied.
– Use the needle only when in good condition – Don’t use a nicked or dull needle as it can lead to serious tension issues.
– Avoid a build-up of fluff or lint in the bobbin case. It is because even a bit of line can cause a broken thread or poor tension. Removing the stitching plate, followed by cleaning the bobbin case area, can help avoid this issue.
Stitch Type, Direction and Regularity
Choose two basic stitch types – free motion straight stitch and free motion zigzag stitch based on your style and project. There are some times when you can’t do without even stitching. To achieve even stitching, don’t focus on the length of your stitches. Instead, learn to coordinate your feet and hands. Stitch slowly if you feel that stitch length is irregular.
Speed up the machine by applying pressure on the foot pedal and slowing down your hand movement to go slow. Doing this will help you prevent skipped stitches that tend to appear when stitching is too slow or due to poor tension.
The result will be more even curves with minimal ‘angular’ circles that can occur easily.
Note: You can create interesting effects with free motion zigzag stitch.
All you need is to keep stitching aligned in neat rows.
With free-motion stitching, you can use different stitch directions to create texture, realism, and depth in your work.
Avoid Fabric Puckering
If you prepare a beautiful background or surface for stitching but find out that the fabric starts drawing up, puckering, bending, bubbling, or buckling, it can really be disappointing. It can also result in an ugly, lumpy, and uneven surface. To avoid this issue, follow some tips below.
– Stabilize your work properly.
– Select base fabrics that have higher thread count as they are more convenient to work on and ‘pull up’ less as compared to lighter or sheer fabrics.
Use a finer thread if you intend to do a huge amount of dense thread painting or embroidery.
As your business grows, you can switch to a completely automatic embroidery machine and start production on an industrial scale.
Read on the steps cum tips to use your automatic embroidery machine.
Turn on your machine
Locate the spool pin on the top. Place your spools of thread over there. Pop one on that spool pin and keep the loose end free. Feed the free end through the thread guide (geometric metal piece on the top left) through the bobbin-winder located to the right of the spool pin.
The bobbin-winder and stopper work along with the spool of thread to wind the thread onto the bobbin before sewing starts.
Locate the stitch adjustment buttons
Look for the stitch adjustment buttons next. Different brand models feature them in different areas.
Turning them onto a specific setting will let you choose the corresponding type of stitch that you want. Twist it forward or backward to select a stitch type.
After selecting the design of your first stitch, find the take-up lever that will let you thread your machine. A take-up lever with two cut-in grooves on the top left.
Monitor the tension dial
A tension dial is a small numbered wheel located nearby the take-up lever.
On the tension being too tight, the needle will get pulled to the right. On the contrary, on the tension being too loose, the thread will hang on the fabric bottom before you start sewing.
Locate the needle clamp screw
The needle clamp screw is the metal piece that holds the needle in place while sewing. It looks like a nail and is toward the right side of the needle.
Find the presser foot
You can find the presser foot beneath the needle clamp screw. It resembles the shape of a foot and is easy to spot. It presses down on the fabric while working just like you would press down the pedal in the free machine.
Besides, there are several models with their setup procedures slightly different from one another. Therefore, always go through the user manual to check and ensure your setup is alright.
Here are the steps to sew on the garment.
– Line the fabric under the needle.
– Ensure that lighting in your workplace is ambient.
– Keep the fabric to the left of your sewing machine while working.
– Don’t pull out the fabric through the machine.
– Hold the loose ends for the first few stitches.
– Avoid forcing the material too much.
– Use the handle for movement of the needle to the highest position. If the thread pulls back during an attempt to remove the fabric, check the needle position, and adjust it.
– Cut the thread after removing the fabric.
In a Nutshell
If you want to start a custom embroidery design business, you can start that right away by following the above-discussed steps and tips properly.
If you want your customers to choose the design they want to get embroidered on their own, you can do so by letting them make their designs themselves through an online product design software.
All product and company names are trademarks™, registered® or copyright© trademarks of their respective holders. Use of them does not imply any affiliation with or endorsement by them.


